Module 04 · Issues, Projects & Discussions
- Explain the difference between a GitHub Issue, a Pull Request, and a Discussion
- Open a well-structured Issue using the project's issue templates
- Create a GitHub Projects board and add issues to it
- Move issues through a kanban workflow as work progresses
- Use the Closes keyword to automatically close an issue when a PR merges
- Describe when to use Discussions vs Issues for proposing new ideas
Background
Modules 00 through 03 focused on the mechanics of Git and GitHub — commits, branches, PRs, and reviews. Those tools manage how code changes. This module is about what changes and why — the planning layer that makes a project legible to contributors who weren’t there from the start.
GitHub gives you three tools for this: Issues track specific pieces of work, Projects organise issues into a workflow, and Discussions provide a space for open-ended conversation before anything becomes a formal task. Together they answer the questions every new contributor to an open-source project needs answered: What needs doing? What’s already in progress? Where do I propose a new idea without immediately opening a PR?
In Module 02, you added a placeholder entry for a Calculate Agent to the
Orchestrator’s registry without implementing it. That placeholder is sitting in
main right now, pointing to a port with nothing listening. This module starts
by opening the Issue that tracks building that agent properly — and then
building the board that shows where it sits in the A2A project’s backlog.
The A2A project has a Calculate Agent registered in the Orchestrator but not yet implemented — a classic “stub” that accumulates technical debt if not tracked. In this module you’ll open an Issue for it, add it to a Projects board, and practice the full lifecycle: Issue → In Progress → PR → Closed. You’ll also use Discussions to propose the next agent the community might want to build — modelling the open-source contribution process that Module 07 covers in depth.
Concepts
Issues: The Unit of Work
A GitHub Issue is a record of something that needs attention — a bug, a
feature, a task, a question. Issues are not just to-do list items; they’re
the permanent record of why a change was made. A PR that says
Closes #23 in its description links the implementation back to the original
request, making the history of the project navigable.
Every Issue has:
| Field | Purpose |
|---|---|
| Title | One sentence that describes the work. Specific enough to be unique. |
| Description | What, why, acceptance criteria, and anything a contributor needs to start |
| Labels | Categorise by type (bug, feat, docs) and status (needs-triage, good first issue) |
| Assignees | Who is currently working on this |
| Milestone | Which release or sprint this belongs to |
| Projects | Which board this issue appears on |
What Makes a Good Issue Title?
❌ "Bug with search"❌ "Add agent"❌ "Fix the thing we discussed"
✅ "Search Agent returns 500 when input contains special characters"✅ "feat: implement Calculate Agent for basic arithmetic operations"✅ "docs: Module 05 Step 3 command produces Permission Denied on Windows"
A good title is specific enough that someone scanning the issue list can understand the work without opening it.
Labels
Labels are coloured tags that filter and categorise issues. This project uses two layers of labels:
Type labels — what kind of work is this?
| Label | Colour | Meaning |
|---|---|---|
bug | Red | Something is broken |
feat | Green | New capability |
docs | Blue | Documentation only |
chore | Grey | Maintenance, tooling |
security | Orange | Security issue or improvement |
translation | Purple | Translated content |
Status labels — where is this in the workflow?
| Label | Meaning |
|---|---|
needs-triage | Newly opened, not yet assessed |
good first issue | Suitable for a first-time contributor |
help wanted | Maintainers welcome external contributions |
blocked | Waiting on something external |
wontfix | Acknowledged but will not be addressed |
Issues vs. Pull Requests vs. Discussions
These three tools are often confused. Here’s when to use each:
| Situation | Use |
|---|---|
| Reporting a bug | Issue |
| Requesting a new feature you’re not planning to build | Issue |
| Tracking a specific piece of work | Issue |
| Proposing a significant change that needs community input | Discussion |
| Asking a question about how something works | Discussion |
| Contributing a code or content change | Pull Request |
| Discussing the direction of the project | Discussion |
The key distinction between Issues and Discussions: an Issue is a task with a defined done state — it gets closed when the work is merged. A Discussion is a conversation that may never close, or that closes by converting to an Issue once there’s consensus on what to do.
The rule for this project: significant new modules, new agent types, or
changes to the course structure go through a Discussion first. The
new-module.yml issue template even requires a link to a prior Discussion
before it will submit.
GitHub Projects
GitHub Projects is a built-in project management tool that lives alongside your repository. It supports kanban boards, tables, and roadmap views. Issues and PRs from your repository can be added to a Project and tracked as cards.
A basic board has three columns:
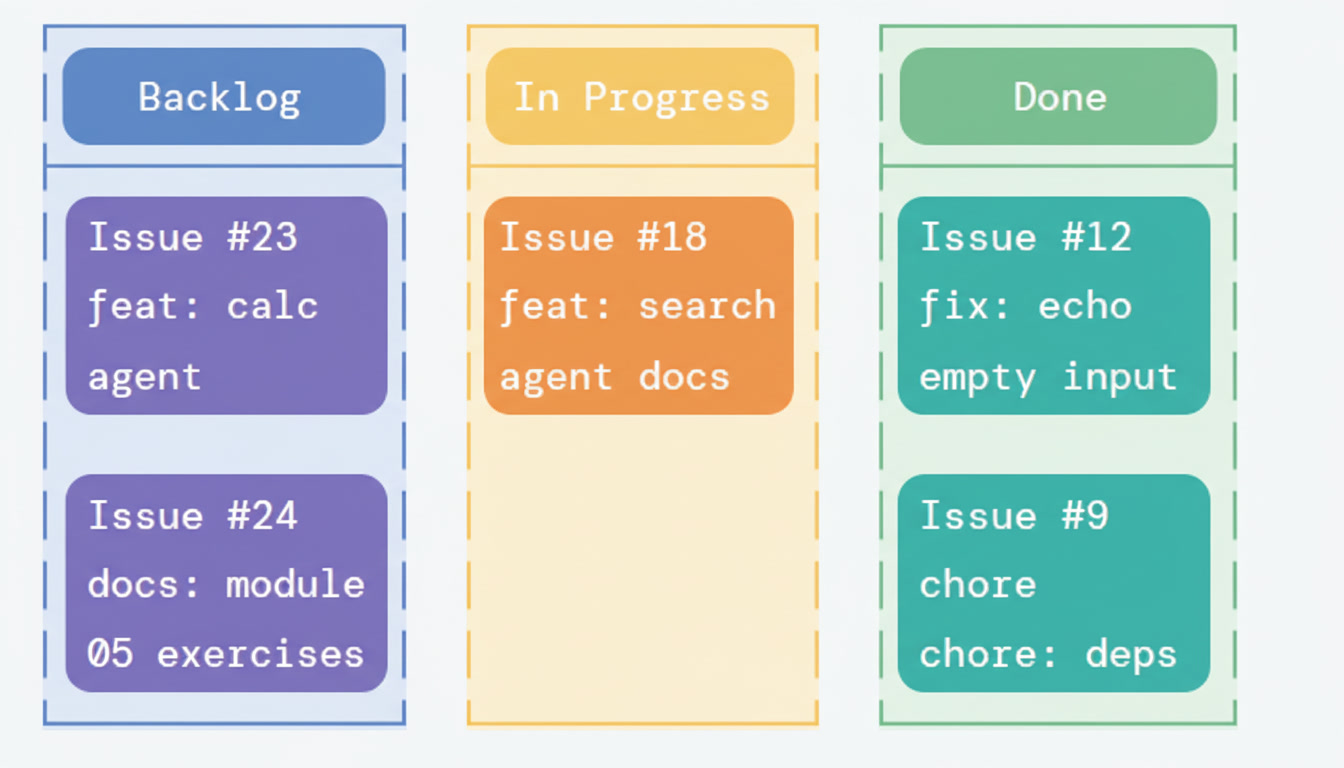
Cards move left to right as work progresses. When the PR that closes an issue merges, GitHub can automatically move the card to Done.
Closing Issues with Keywords
When you open a PR to fix an Issue, link them with a closing keyword in the PR description. When the PR merges, GitHub automatically closes the Issue.
## Related IssueCloses #23
<!-- Other keywords that work the same way: --><!-- Fixes #23 --><!-- Resolves #23 -->
You can close multiple issues from one PR:
Closes #23, closes #24And you can reference without closing (for related context):
Related to #19See also #21Exercise
Part 1 — Set Up Labels
Before opening issues, make sure the project has the labels it needs. GitHub creates a default set of labels on every new repository, but this project uses a more specific set.
-
Navigate to your fork on GitHub and click Issues → Labels (or go directly to
https://github.com/YOUR-USERNAME/git-github-security-learning/labels) -
Review the existing labels. Delete any that don’t fit the project’s conventions (click the label → Delete).
-
Create the following labels if they don’t exist. Click New label for each:
Name Colour (hex) Description feat#0075caNew feature or capability bug#d73a4aSomething is broken docs#0052ccDocumentation changes chore#e4e669Maintenance and tooling security#e4793fSecurity issue or improvement translation#7057ffTranslated content needs-triage#edededNewly opened, not yet assessed good first issue#7057ffGood for first-time contributors help wanted#008672External contributions welcome blocked#b60205Waiting on something external starter-project#1d76dbRelates to the A2A starter project module-content#0e8a16Lesson content additions or fixes -
When done, your Labels page should have a clean, consistent set. Labels are repository-wide — they apply to both Issues and PRs.
Part 2 — Open the Calculate Agent Issue
In Module 02 you registered a calculate agent in the Orchestrator as part
of resolving a merge conflict. It points to port 8003, but nothing is running
there. Track the actual implementation work as an Issue.
-
Click Issues → New issue.
-
You’ll see the issue template chooser. Select 🤖 New Exercise or Challenge Idea — wait, that’s not right for this. Click Open a blank issue for now. (In Part 4 you’ll use the starter project issue template.)
-
Set the title:
feat: implement Calculate Agent for basic arithmetic operations -
Write the description. A good issue description includes what, why, and acceptance criteria:
## BackgroundThe Calculate Agent was registered in the Orchestrator's AGENT_REGISTRYin the Module 02 merge conflict exercise (see commit abc1234) as aplaceholder. Port 8003 is reserved but nothing is listening there.## What needs to be doneImplement a Specialist Agent that handles basic arithmetic operationsrouted from the Orchestrator with `"task": "calculate"`.## Acceptance Criteria- [ ] Agent runs on port 8003 (configurable via `CALCULATE_AGENT_URL`)- [ ] Accepts standard A2A request schema (`task`, `input`)- [ ] Parses arithmetic expressions from the `input` fielde.g. `"input": "12 * 7"` → `"output": "84"`- [ ] Returns `status: "error"` with a descriptive message forinvalid expressions (e.g. division by zero, unparseable input)- [ ] Unit tests cover success and error cases- [ ] Both Python and Node.js variants implemented- [ ] Agent registered in `.env.example`## Notes- Use Python's `ast.literal_eval` or a safe expression parser —never `eval()` directly on user input (security risk)- The Node.js variant can use a similar safe parsing approach -
On the right sidebar:
- Labels: Add
featandstarter-project - Assignees: Assign yourself
- Leave Milestone and Project blank for now — you’ll add the Project in Part 3
- Labels: Add
-
Click Submit new issue. Note the issue number — you’ll need it shortly (it will be something like
#1on a fresh fork).
Part 3 — Create a GitHub Projects Board
-
Click the Projects tab on your repository.
-
Click Link a project → New project.
-
Select Board as the template.
-
Name it:
A2A Agent Development -
Click Create project. GitHub opens the board with three default columns: Todo, In Progress, and Done.
-
Rename the columns to match the project’s workflow. Click the
...menu on each column header → Edit column:- Todo →
Backlog - In Progress →
In Progress - Done →
Done
- Todo →
-
Add a fourth column for review. Click + Add column on the right edge:
- Name:
In Review - Position it between In Progress and Done
Your board now has: Backlog → In Progress → In Review → Done
- Name:
-
Click + Add item in the Backlog column. Type
#— GitHub shows a dropdown of your repository’s issues. Select the Calculate Agent issue you just opened.The issue appears as a card on the board. Click it to expand — you can see the full description and all the sidebar metadata directly from the board view.
Part 4 — Open a Second Issue Using a Template
Practice opening an issue through the template chooser — the experience that contributors to this project will have.
-
Navigate to Issues → New issue.
-
This time, click Get started next to 🤖 New Exercise or Challenge Idea.
-
Fill in the form:
- Which module:
Module 04 — Issues, Projects & Discussions - Exercise title:
Use labels to triage a batch of incoming issues - GitHub skill:
Applying labels, assigning issues, and using the triage workflow to prioritise a backlog - A2A connection:
Learners receive a batch of 5 pre-written issues about the A2A starter project and must triage them: apply correct labels, set assignees, and decide which belong in Backlog vs. which need more information first - Difficulty:
Semi-guided - Format:
Individual exercise - Description:
Setup: A set of 5 issues have been opened against the A2A projectwith no labels, no assignees, and no milestone.The learner will:1. Read each issue and determine its type (bug, feat, docs, chore)2. Apply appropriate labels3. Assign each to themselves or mark as "help wanted"4. Move each to the correct column on the Projects board5. Close any that are duplicates with a reference to the originalSuccess looks like: All 5 issues are labelled, assigned, and onthe board in the correct column.
- Check Yes — I’d like to open a PR with the full exercise
- Check the pre-submit checklist items
- Which module:
-
Click Submit new issue.
-
Add this new issue to your Projects board from the issue’s sidebar: click Projects → select A2A Agent Development → it appears in Backlog.
-
Back on the board, drag the second issue to confirm drag-and-drop works. Then drag it back to Backlog.
Part 5 — Simulate the Issue Lifecycle
Walk an issue through its full lifecycle so the board mechanics are clear.
-
Open your Projects board.
-
Drag the Calculate Agent issue from Backlog to In Progress. This represents you picking up the work.
-
Now open a placeholder branch to represent doing the work:
Terminal window git switch maingit pull origin maingit switch -c feat/calculate-agent -
Create a minimal placeholder file so you have something to commit:
Terminal window echo "# Calculate Agent — implementation coming soon" > agents/calculate/README.mdmkdir -p agents/calculategit add agents/calculate/README.mdgit commit -m "feat(calculate-agent): scaffold agent directoryPlaceholder for the Calculate Agent implementation.Tracked in issue #1 (update with your actual issue number)."git push origin feat/calculate-agent -
Open a Draft PR for this branch:
- Go to your repository → Pull requests → New pull request
- Set base:
main, compare:feat/calculate-agent - Title:
feat: implement Calculate Agent - In the description, add:
Closes #1(use your actual issue number) - Click the arrow on the green button → select Create draft pull request
-
Return to the Projects board. Move the Calculate Agent card to In Review — the draft PR represents work that’s waiting for review.
-
Notice that the issue and the draft PR are now linked — click the issue number in the PR description and GitHub takes you directly to the issue, showing the PR as a linked development item.
Part 6 — Start a Discussion
Some ideas are too big or too uncertain for an Issue. Discussions let the community weigh in before anyone commits to building something.
-
Click the Discussions tab on your repository.
If Discussions isn’t enabled, go to Settings → scroll to Features → check Discussions → Save.
-
Click New discussion. Select the 💡 Ideas category.
-
Write a Discussion proposing a new agent:
Title:
Proposal: Weather Agent as a Module 09 Capstone suggestionBody:
## The IdeaAdd a Weather Agent to the A2A system as a suggested Capstoneproject for learners who finish Module 09 looking for an extension.## What it would doRoute tasks with `"task": "weather"` to an agent that calls apublic weather API (e.g. Open-Meteo, which is free and requiresno API key) and returns a plain-English forecast.Example:- Input: `"What's the weather in Tokyo?"`- Output: `"Tokyo: 18°C, partly cloudy, 20% chance of rain"`## Why this agent works well as a Capstone- Introduces real API integration (vs. the mock Search Agent)- Requires parsing structured API responses into natural language- Open-Meteo has no auth requirement, so there's no API key setup- Learners must write a `.env.example` entry for the API base URL —reinforcing Module 00's secret handling lesson- Creates a natural opportunity to add error handling forunrecognised city names## Questions for the community1. Should this be a suggested Capstone or a full Module 10?2. Should we support both a real API and a mock fallback like theSearch Agent does?3. Are there better API choices that work well without auth?## RelatedSee also the Search Agent implementation in `agents/search/` forthe pattern this would follow. -
Click Start discussion.
-
React to your own discussion with a 👍 — on a real project, reactions are how maintainers gauge community interest without counting comment volume.
-
Now observe the difference between this Discussion and the Issues you opened: the Discussion has no assignee, no label in the task sense, and no done state. It’s a conversation, not a task.
Part 7 — Convert a Discussion to an Issue
When a Discussion reaches consensus, you convert it to an Issue to track the actual implementation.
-
In your Weather Agent discussion, click the
...menu in the top-right corner of the original post. -
Select Create issue from discussion.
-
GitHub pre-fills an issue with the discussion title and a link back to the discussion. Edit the title and description as needed:
Title:
feat: add Weather Agent as Capstone extensionKeep the description, but add Acceptance Criteria:
## Acceptance Criteria- [ ] Agent routes on `"task": "weather"`- [ ] Uses Open-Meteo API (no auth required)- [ ] Returns plain-English forecast from `input` city name- [ ] Returns `status: "error"` for unrecognised locations- [ ] Both Python and Node.js variants- [ ] Mock fallback for offline/CI use*Originated in Discussion #2 (update with your actual number)* -
Add labels:
feat,starter-project,good first issue -
Submit the issue.
-
Add it to the Projects board in Backlog.
You now have a board showing two items in Backlog (Calculate Agent, Weather Agent) and one in In Review (Calculate Agent draft PR). That’s a real project board — small but complete.
Issue and Discussion Best Practices
✅ One issue, one piece of work   If you find yourself writing "and also..." in an issue,   that's probably two issues.
✅ Include acceptance criteria   A list of checkboxes that defines "done" — prevents   scope creep and gives reviewers a checklist.
✅ Link to related issues and PRs   "Blocked by #12", "Related to #7", "Supersedes #4"   — the more connected the history, the easier it is   to understand decisions made months ago.
✅ Close issues promptly   An issue that's been resolved but left open pollutes   the backlog. Use Closes #N in the PR.
❌ Don't assign issues to someone without asking   Assign yourself, or use "help wanted" to signal   the issue is available.
❌ Don't close issues with "wontfix" without explanation   Always leave a comment explaining why before closing.
✅ Use Discussions for open-ended questions "Should we add X?" → Discussion "Add X" → Issue (after Discussion reaches consensus)
✅ Mark the answer when resolved GitHub lets you mark a comment as the "answer" to a Discussion. This signals to later readers that the question has a settled response.
✅ Convert to Issue when ready Once a Discussion has enough consensus, convert it — don't leave proposals floating in Discussions forever.
❌ Don't use Discussions to report bugs Bugs go in Issues where they can be labelled, assigned, and tracked. A bug report in Discussions may never get fixed because no one is watching for it.
❌ Don't use Issues for brainstorming Issues signal work that needs doing. Brainstorming in an Issue creates false urgency and clutters the backlog.Milestones group issues into time-bounded goals.Create one for the next course release:
Title: v1.1.0 — Modules 05 and 06 contentDue date: 30 days from todayDescription: All issues needed to publish the GitHub Actions and Security modules to the live docs site.
Add issues to a milestone from the issue's sidebar.The Milestones page shows percentage complete as issuesare closed — a quick health check for a release.
✅ Use milestones for releases and sprints❌ Don't create milestones so far in advance they become meaningless ("v3.0 someday")Summary
In this module you:
- Understood the distinction between Issues (tasks with a done state), Discussions (open conversations), and Pull Requests (code proposals)
- Created a complete label taxonomy for the project covering type and status
- Opened a well-structured Issue with a title, description, and acceptance criteria for the Calculate Agent
- Built a GitHub Projects board with four columns: Backlog, In Progress, In Review, Done
- Used the project’s issue template to propose a new exercise
- Walked an issue through the full lifecycle: Backlog → In Progress → In Review, linked to a Draft PR
- Started a Discussion to propose the Weather Agent, then converted it to an Issue once it had a clear scope
- Learned about Private Vulnerability Reporting and when it matters for an AI project
The Issues and Projects board you created here is the planning layer for every module that follows. As you build the CI pipeline in Module 05 and the security configuration in Module 06, you’ll open Issues before starting each piece of work — the habit that makes collaborative development coherent.
What’s Next
Module 05 · GitHub Actions & CI/CD →
You’ll build the CI pipeline that runs on every PR to the A2A project — linting the code, running the unit tests against both Python versions, validating the A2A message schema, and enforcing the CI Gate pattern that makes the required status checks maintainable as the project grows.