Module 03 · Pull Requests & Code Review
- Explain the purpose of a Pull Request and how it differs from a merge
- Open a Pull Request with a description that communicates what, why, and how to test
- Request a review and respond to reviewer feedback
- Leave a constructive code review comment using the suggest changes feature
- Describe what security-aware code review means for AI agent contributions
- Merge a Pull Request using the appropriate merge strategy
Background
In Module 02 you merged the Search Agent directly on the command line. That
works — but it bypasses the most valuable part of collaborative development:
someone else reading your code before it lands in main.
A Pull Request (PR) is a formal proposal to merge one branch into another.
GitHub layers a conversation on top of the merge — reviewers can leave comments,
request changes, suggest specific edits, and ultimately approve the work before
a single line reaches main. For teams, this is where most of the real software
engineering happens: design decisions get made, bugs get caught, and knowledge
gets shared.
For an AI project, code review has an extra dimension. A new agent contribution can introduce security issues that are unique to AI systems — prompt injection vulnerabilities, unsafe handling of external data, or an agent that leaks context it shouldn’t. A security-aware reviewer knows what to look for.
In Module 02 you merged the Search Agent locally. In this module you’ll re-create that branch from scratch — cleanly, with no merge conflict — and take it through the full Pull Request lifecycle: open, review, address feedback, and merge via GitHub’s UI. This is the workflow every future contribution to the A2A project will follow.
Concepts
What Is a Pull Request?
A Pull Request is not a Git concept — it’s a GitHub feature built on top of Git. Git only knows about commits and merges. GitHub adds the human layer: a discussion thread, a diff view, inline comments, review requests, CI status checks, and a merge button.
When you open a PR you’re saying: “Here is a branch. Here is what it does.
I’d like someone to review it before it merges into main.”
The PR stays open until one of three things happens:
- It is merged — the branch is integrated into the target
- It is closed without merging — the proposal is rejected or abandoned
- The branch is deleted — GitHub automatically offers to close the PR
Anatomy of a Good PR Description
A PR description is not a commit message — it’s a document for your reviewer. It should answer three questions without the reviewer having to read any code:
What — What does this change do? One or two sentences, plain language.
Why — Why is this change needed? What problem does it solve? Link to the related Issue if one exists.
How to test — What should a reviewer do to verify the change works? Exact commands, expected output.
## What does this PR do?Adds the Search Agent as a new Specialist Agent in the A2A system. TheOrchestrator now routes tasks with `"task": "search"` to the Search Agenton port 8002. This is the second agent in the system after the Echo Agent.
## Related IssueCloses #14
## How to test1. Start the Search Agent: `python agents/search/main.py`2. Start the Orchestrator: `python orchestrator/main.py`3. Send a search request:   curl -X POST http://localhost:8000/run \     -H "Content-Type: application/json" \     -d '{"task": "search", "input": "What is a pull request?"}'4. Expected output: JSON with "status": "success" and a description   of pull requests in the "output" field.
The Review Lifecycle
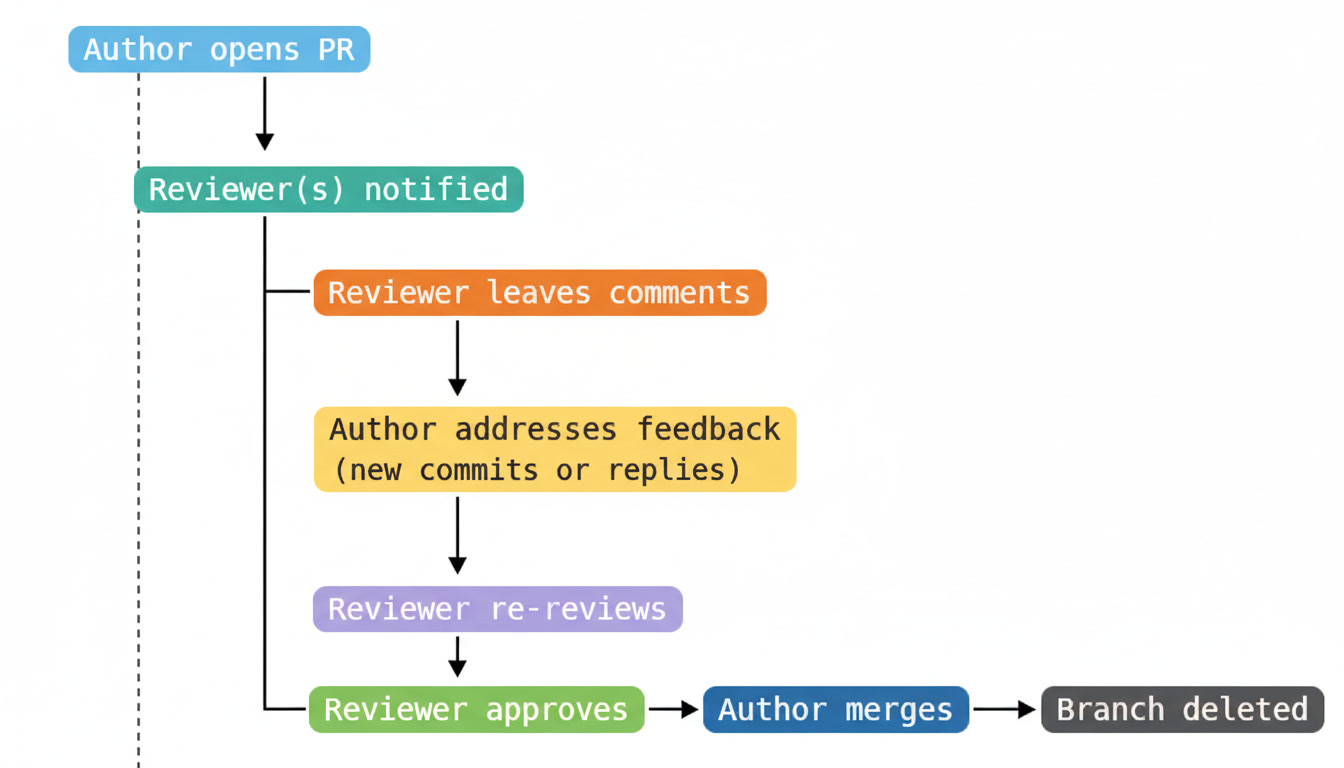
A review can have three outcomes:
- Comment — General feedback, no explicit approval or rejection
- Request changes — Reviewer found something that must be fixed before merging
- Approve — Reviewer is satisfied and the PR can be merged
Types of Review Comments
General comment — Posted at the PR level, not tied to a specific line. Use for overall design feedback or questions.
Inline comment — Posted on a specific line of the diff. Use when feedback is about a particular piece of code.
Suggested change — A special inline comment that proposes an exact edit. The author can accept it with one click, which creates a commit. Use these for small, precise fixes (typos, minor rewording, a missing check).
<!-- Suggesting a change in a review comment: -->
```suggestion    "search":    os.getenv("SEARCH_AGENT_URL", "http://localhost:8002"),```
This aligns the values with the echo entry above — easier to scan.
Draft Pull Requests
A Draft PR signals that a branch is not ready for review yet. It shows up in the PR list with a grey “Draft” badge and the merge button is disabled. Use drafts when you want to:
- Show work in progress to get early design feedback
- Run CI on a branch without requesting a formal review
- Keep a branch visible in the PR list while you’re still working
Convert a draft to “Ready for review” when you want reviewers to approve.
Merge Strategies
GitHub offers three merge strategies on the merge button dropdown:
| Strategy | Creates | History |
|---|---|---|
| Create a merge commit | A merge commit | Full branch history preserved |
| Squash and merge | One commit on main | All branch commits collapsed |
| Rebase and merge | Branch commits replayed linearly | No merge commit |
For this project, use Create a merge commit for feature branches. It
preserves the full branch history and makes it clear in the log that a
feature was developed in isolation and then merged. Squash and merge is
useful when a branch has many messy WIP commits you don’t want cluttering
main’s history.
Exercise
Part 1 — Create a Clean Feature Branch
In Module 02 you merged the Search Agent directly. Here you’ll create a fresh, clean branch — as if Module 02 hadn’t happened — so you can practice the full PR workflow from the start.
-
Make sure
mainis up to date:Terminal window cd ~/github-for-ai-builders/starter-project/pythongit switch maingit pull origin main -
Create a fresh feature branch:
Terminal window git switch -c feat/specialist-agent-search -
Stage and commit the Search Agent in a single focused commit:
Terminal window git add agents/search/main.pygit commit -m "feat(search-agent): add mock search specialist agent" -
Commit the Orchestrator registry update separately:
Terminal window git add orchestrator/main.pygit commit -m "feat(orchestrator): register search agent in routing table" -
Commit the environment example update:
Terminal window git add .env.examplegit commit -m "chore(config): add SEARCH_AGENT_URL to env example" -
Push the branch to GitHub:
Terminal window git push origin feat/specialist-agent-search
Part 2 — Open the Pull Request
-
Navigate to your fork on GitHub:
https://github.com/YOUR-USERNAME/git-github-security-learning -
GitHub shows a yellow banner: “feat/specialist-agent-search had recent pushes”. Click Compare & pull request.
If the banner has disappeared, click the Pull requests tab → New pull request, then select
feat/specialist-agent-searchas the compare branch. -
Review the base and compare fields at the top:
- base:
main← this is where your changes will merge into - compare:
feat/specialist-agent-search← your branch
- base:
-
GitHub auto-populates the title from your most recent commit message. Edit it to be descriptive and human-readable:
feat(search-agent): add Search Agent to A2A system -
Fill in the PR description using the template. The project’s
PULL_REQUEST_TEMPLATE.mdpre-populates the text area — fill in each section:What does this PR do?
Adds the Search Agent as a Specialist Agent in the A2A system.The Orchestrator now routes tasks with "task": "search" to theSearch Agent on port 8002. This is the second agent in the system.The implementation uses mock results to keep the exercise focusedon GitHub workflow rather than API configuration.Type of Change: Check
🤖 Starter projectModule(s) Affected:
Starter Project — Python variantTesting:
1. python agents/search/main.py2. python orchestrator/main.py (separate terminal)3. curl -X POST http://localhost:8000/run \-H "Content-Type: application/json" \-d '{"task": "search", "input": "What is a pull request?"}'4. Expected: {"agent":"search","status":"success","output":"A pull request..."} -
Leave Reviewers blank for now — you’ll request a review in Part 3.
-
Click Create pull request.
You’re looking at the PR page. Familiarise yourself with the four tabs:
- Conversation — the main discussion thread and activity timeline
- Commits — the commits on this branch (3 in your case)
- Checks — CI status (will show once CI is configured in Module 05)
- Files changed — the full diff of every file this PR touches
Part 3 — Request and Give a Review
For this exercise you’ll practice the review workflow using GitHub’s review tools directly on your own PR. In a real project, you’d request a review from a teammate — but the mechanics are identical.
-
Click the Files changed tab on your PR.
-
Find the
orchestrator/main.pydiff. You should see theAGENT_REGISTRYdictionary with the newsearchentry added. -
Hover over the line number next to the
searchentry. A blue+button appears. Click it to open an inline comment. -
Type a review comment as if you were the reviewer:
The alignment here looks inconsistent — the echo entry uses two spacesafter the colon, search uses one. Minor, but worth a suggestion. -
Below your comment text, click Add a suggestion (the icon that looks like
±). GitHub pre-fills the current line content inside a code fence. Edit it to the suggested version:```suggestion"search": os.getenv("SEARCH_AGENT_URL", "http://localhost:8002"),``` -
Click Start a review (not “Add single comment” — starting a review lets you batch multiple comments before submitting).
-
Find the
agents/search/main.pydiff. Leave a second inline comment on themock_searchfunction:Good choice to mock this for the exercise. Worth adding a TODO commenthere so future contributors know a real implementation is expected. -
Click Finish your review in the top-right corner of the Files changed view. Select Request changes, write a summary:
Two small items before merging:1. Alignment nit in the AGENT_REGISTRY dictionary2. Add a TODO comment to mock_search() pointing to the real implementationClick Submit review.
Part 4 — Address the Review Feedback
-
Switch back to your terminal. You’re still on
feat/specialist-agent-search. -
Open
orchestrator/main.pyand fix the alignment nit from the review. Make the registry consistent:AGENT_REGISTRY: dict[str, str] = {"echo": os.getenv("ECHO_AGENT_URL", "http://localhost:8001"),"search": os.getenv("SEARCH_AGENT_URL", "http://localhost:8002"),} -
Open
agents/search/main.pyand add the TODO comment abovemock_search:# TODO: Replace with a real search API integration (Brave, Tavily, SerpAPI)# See: https://github.com/fischer3-net/git-github-security-learning/issuesdef mock_search(query: str) -> str: -
Commit both fixes together — they’re both addressing the same review:
Terminal window git add orchestrator/main.py agents/search/main.pygit commit -m "fix(search-agent): address PR review feedback- Align AGENT_REGISTRY values for readability- Add TODO comment to mock_search pointing to real API integration" -
Push the new commit:
Terminal window git push origin feat/specialist-agent-search -
Return to the PR on GitHub. You’ll see the new commit appeared in the Commits tab and the Files changed diff has updated automatically.
-
Reply to the reviewer’s comments in the Conversation tab:
Fixed both items in the latest commit. The registry is now consistentlyaligned and mock_search has a TODO pointing to the real implementation. -
Click Re-request review (the circular arrow icon next to the reviewer’s name in the right sidebar). This notifies the reviewer that you’ve addressed their feedback.
Part 5 — Approve and Merge
-
Go back to the Files changed tab and review the updated diff.
-
Confirm both issues from the review are addressed, then click Review changes → select Approve → write:
Looks good — alignment is clean and the TODO makes the mock intent clear.Click Submit review. The PR now shows a green ✅ approval.
-
Return to the Conversation tab. Scroll to the bottom where the merge section is.
-
Click the dropdown arrow on the merge button and select Create a merge commit (if not already selected).
-
Edit the merge commit message if you like, then click Confirm merge.
-
GitHub confirms the merge and offers to delete the branch. Click Delete branch — feature branches should be cleaned up after merging.
-
Navigate to the Code tab of your repository. Click main in the branch dropdown and open
orchestrator/main.py. Confirm the Search Agent entry is now inAGENT_REGISTRYonmain. ✅ -
Sync your local
mainwith the merge:Terminal window git switch maingit pull origin maingit branch -d feat/specialist-agent-search
Part 6 — Read Your PR’s Permanent Record
-
Click the Pull requests tab on your repository, then click Closed to see merged PRs.
-
Open the PR you just merged. Everything is preserved:
- The original description
- Every review comment and suggestion
- The commit that addressed the feedback
- The approval and merge timestamp
-
Click through the Commits tab inside the PR — each commit links to its full diff. Click through the Files changed tab — it shows the complete final diff, not the intermediate versions.
This permanent record is one of GitHub’s most underappreciated features. Six months from now, when someone asks “why does the Search Agent use mock results?”, the PR description and review thread are the answer — without anyone having to remember or explain.
Writing Effective Review Comments
Review comments are a communication act as much as a technical one. The goal is to improve the code and preserve the relationship with the author.
❌ "This is wrong."✅ "This will fail if the input is empty — could we add a guard here?"
❌ "Why did you do it this way?"✅ "I'd expect this to use the shared `errorResponse()` helper —    is there a reason for the inline version here?"
❌ "Fix the indentation."✅ [Use a suggestion instead of a comment for small formatting issues]
The difference between a comment and a question is significant. Questions invite a conversation — the author might have a good reason you haven’t considered. Comments that read as commands create friction without leaving room for that.
Some teams use prefixes to signal the weight of a comment:
nit: Minor style issue — feel free to fix or ignorenit: Extra blank line before the return statement
suggestion: Here's a specific edit that might helpsuggestion: This could use the shared validateRequest() instead
question: I want to understand before commentingquestion: Is this timeout intentional, or a placeholder?
blocking: This must be fixed before mergeblocking: This will panic on empty input — needs a guard
Using prefixes prevents “request changes” reviews where the author isn’t sure which comments are blockers and which are optional.
Use suggested changes for small, precise edits — they let the author accept your fix with one click, which creates a commit with your name as co-author:
The variable name `r` is hard to read at a glance. How about:
```suggestion    response = await client.post(endpoint, json=payload)```
Don’t use suggestions for changes that require discussion — if your suggestion might be wrong, write a comment instead and let the author decide.
The PR Checklist
The project’s PULL_REQUEST_TEMPLATE.md has a checklist that every PR author
fills out before requesting a review. Reviewers use the same checklist to
verify the PR is complete. The most important items for the starter project:
### Starter Project Changes
- [ ] No secrets, API keys, or credentials are hardcoded- [ ] A .env.example is included for any new environment variables- [ ] Unit tests are included for new agent logic- [ ] The agent is registered in the Orchestrator's routing table- [ ] Changes work in both Python and Node.js variants      (or are clearly scoped to one)
Run through this checklist before opening any PR that touches starter-project/.
If an item isn’t checked and you didn’t explain why in the description, the
reviewer will ask.
Summary
In this module you:
- Opened a Pull Request with a description covering what, why, and how to test
- Used the Files changed tab to review the complete diff before merging
- Left inline review comments and a suggested change on specific lines
- Submitted a Request changes review and then an Approve review
- Addressed reviewer feedback in a new commit and pushed it to the same branch
- Merged the PR using Create a merge commit and deleted the branch
- Read the permanent record left by the PR — description, comments, commits, and approval
The PR workflow you practiced here is the same one every contributor to this project will follow. From Module 04 onwards, every change you propose — including Issues and project board updates — feeds directly into opening better Pull Requests.
What’s Next
Module 04 · Issues, Projects & Discussions →
You’ll open an Issue to track the next A2A feature, organise work on a GitHub Projects board, and use Discussions to propose a new module before writing a single line — the planning layer that makes large open-source contributions coherent.