Module 01 · Repositories & Commits
- Explain the difference between a working directory, staging area, and commit history
- Initialize a Git repository and make your first commit
- Write commit messages that follow the Conventional Commits convention
- Author a README.md using Markdown that clearly describes a project
- Use git log, git diff, and git status to inspect repository state
Background
A repository (or “repo”) is Git’s name for a project folder that has version control enabled. Every file change, every save, every decision you make gets recorded as a commit — a snapshot of the project at a specific point in time. Together, these commits form a history you can inspect, rewind, and share.
This might sound abstract, so let’s ground it immediately: the Orchestrator Agent is the brain of your A2A system. Right now it exists only on disk. By the end of this module, it will exist as a properly initialized Git repository with a history that documents every intentional decision you made — and a README that explains the whole system to anyone who finds it on GitHub.
The Orchestrator is the entry point for the entire A2A system — it receives incoming task requests and routes them to the right Specialist Agent. In this module you’ll initialize its repository, write a README that explains the full A2A architecture (Orchestrator + Echo Agent + Search Agent), and commit the initial project files. Every commit message you write here will model the Conventional Commits standard that the CI pipeline enforces in Module 05.
Concepts
The Three Areas of Git
Understanding Git requires understanding three distinct places your files can live:
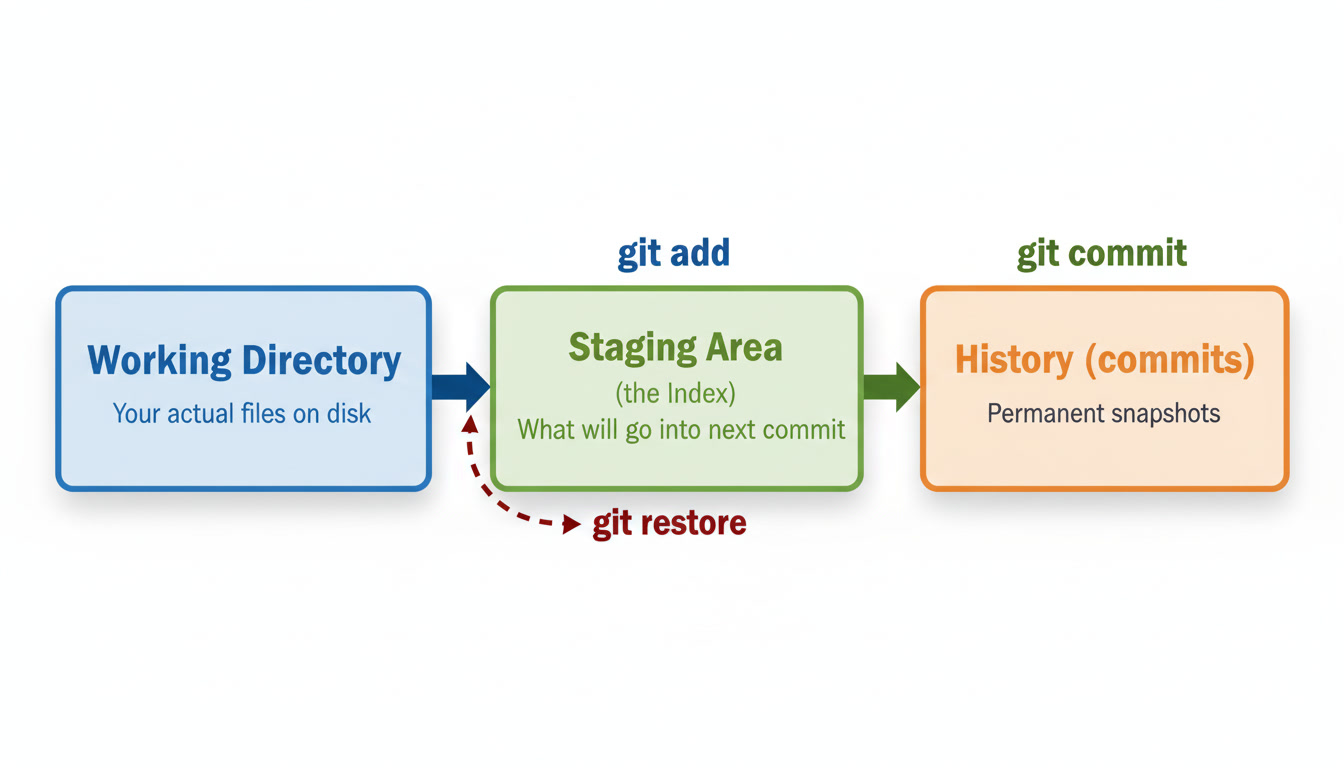
| Area | What it is | Command to move files in |
|---|---|---|
| Working Directory | Your files as they currently exist on disk | (you edit them directly) |
| Staging Area | Files you’ve marked as ready for the next commit | git add |
| History | Permanent, immutable snapshots of the project | git commit |
The staging area is the key insight. It lets you be deliberate about what goes into each commit — you might edit five files but only stage three of them, so your commit stays focused on one logical change.
What is git init?
git init creates a new, empty Git repository in the current directory. It adds a hidden .git/ folder that stores the entire project history. You only ever run this once per project.
git init# Initialized empty Git repository in /path/to/project/.git/Staging Files with git add
git add README.md # Stage a specific filegit add orchestrator/ # Stage everything in a directorygit add . # Stage all changes in the current directorygit add -p # Interactively stage individual chunks (powerful — try it later)After running git add, use git status to see what’s staged (green) vs. unstaged (red).
Writing Good Commit Messages
A commit message is a gift to your future self and your collaborators. This course uses the Conventional Commits specification — the same standard enforced by the CI pipeline in Module 05.
Format:
<type>(<scope>): <short description>
[optional body — explain the why, not the what]
[optional footer: closes #issue-number]
Common types:
| Type | When to use it |
|---|---|
feat | A new feature or capability |
fix | A bug fix |
docs | Documentation changes only |
chore | Maintenance — deps, config, tooling |
test | Adding or updating tests |
refactor | Code change that neither fixes a bug nor adds a feature |
Examples — bad vs. good:
# ❌ Bad — tells you nothing about why or what changedgit commit -m "update"git commit -m "fix stuff"git commit -m "WIP"
# ✅ Good — type, scope, clear descriptiongit commit -m "feat(orchestrator): add keyword-based agent routing"git commit -m "docs(readme): describe A2A system architecture"git commit -m "fix(echo-agent): handle empty input with 422 response"What Makes a Good README?
A README is the front door of your project. When someone lands on your GitHub repository, the README is the first thing they read. A good README answers:
- What does this project do?
- Why does it exist?
- How do I run it?
- How do I contribute?
For the Orchestrator, the README needs to explain the entire A2A system — because the Orchestrator only makes sense in context of the agents it routes to.
Useful Inspection Commands
git status # What's staged, unstaged, or untracked?git diff # What changed in unstaged files?git diff --staged # What changed in staged files?git log # Full commit historygit log --oneline # Compact history — one line per commitgit log --oneline --graph # History as a text diagram (useful in Module 02)git show <commit-sha> # See exactly what changed in a specific commitExercise
Part 1 — Inspect the Current State
-
In your Codespace terminal, navigate to the Python starter project:
Terminal window cd ~/github-for-ai-builders/starter-project/python -
Check that
orchestrator/main.pyexists:Terminal window ls orchestrator/You should see
main.py. -
Run
git statusto see the current state:Terminal window git statusYou’ll see untracked files — the Orchestrator code exists on disk but has never been committed.
-
View the existing commit history:
Terminal window git log --oneline -5This shows the last 5 commits from the original repository history.
Part 2 — Write the Orchestrator README
Before committing any code, write the documentation. This order is intentional — it forces you to think about what the project does before diving into how it’s implemented.
-
Create a
README.mdin the orchestrator directory:Terminal window code orchestrator/README.md -
Write the README using the template below. Replace the bracketed placeholders with your own words:
# Orchestrator AgentThe Orchestrator is the entry point for the A2A (Agent-to-Agent) system.It receives task requests and routes them to the appropriate Specialist Agentbased on the `task` keyword in the request.## System Architecture```Client Request│▼Orchestrator (port 8000)│├──▶ Echo Agent (port 8001) — task: "echo"└──▶ Search Agent (port 8002) — task: "search"```## Quick Start```bash# Install dependenciespip install -r requirements.txt# Configure environmentcp .env.example .env# Start the Orchestratorpython orchestrator/main.py```## API### `GET /health`Returns the health status of the Orchestrator.### `GET /agents`Lists all registered Specialist Agents.### `POST /run`Routes a task to the appropriate agent.**Request body:**```json{"task": "echo","input": "Your input here"}```**Response:**```json{"agent": "echo","status": "success","output": "Echo: Your input here"}```## Adding a New Agent1. Create your agent in `agents/<name>/main.py`2. Register it in `AGENT_REGISTRY` in `orchestrator/main.py`3. Add its URL to `.env.example`4. Open a Pull Request## LicenseMIT -
Save the file, then check Git’s view:
Terminal window git statusorchestrator/README.mdshould appear as an untracked file — Git sees it exists but isn’t tracking it yet.
Part 3 — Stage and Commit the README
-
Stage the README:
Terminal window git add orchestrator/README.md -
Confirm it’s staged:
Terminal window git statusThe file should appear under “Changes to be committed” in green.
-
Check what you’re about to commit:
Terminal window git diff --stagedThis shows the exact content going into the commit. Get in the habit of reviewing this before every commit — it’s how you catch accidentally staged files.
-
Make your first commit:
Terminal window git commit -m "docs(orchestrator): add README with A2A architecture diagram" -
Confirm the commit landed:
Terminal window git log --oneline -3Your new commit should appear at the top.
Part 4 — Commit the Orchestrator Code
Now commit main.py separately from the README. Two distinct logical changes deserve two distinct commits — keeping them separate makes the history easier to read and easier to revert independently.
-
Stage the Orchestrator source file:
Terminal window git add orchestrator/main.py -
Review what you’re staging:
Terminal window git diff --stagedYou should see the full content of
main.pyas additions (lines prefixed with+). -
Commit with a multi-line message — note the body explaining why:
Terminal window git commit -m "feat(orchestrator): add keyword-based agent routingRoutes incoming task requests to registered Specialist Agentsbased on the task field. Currently supports: echo, search.Agent URLs are configured via environment variables so theOrchestrator doesn't need to be restarted to point at differentagent deployments." -
View your commit history:
Terminal window git log --oneline
Part 5 — Explore the History
-
Inspect your most recent commit in full detail:
Terminal window git show HEADHEADis Git’s pointer to the most recent commit on the current branch. The output shows the commit message, author, timestamp, and every line that changed. -
Compare the README commit to the one before it:
Terminal window git diff HEAD~1 HEAD -- orchestrator/README.mdHEAD~1means “one commit before HEAD.” This is how you inspect what changed between any two points in history. -
Practice interactive staging. Open
orchestrator/README.mdand add a Known Limitations section at the bottom:## Known Limitations- Routing is keyword-based only — the `task` field must exactly matcha registered agent name- No retry logic if an agent is temporarily unavailable- No request authentication between Orchestrator and agentsSave the file, then run:
Terminal window git add -p orchestrator/README.mdGit shows each changed chunk and asks what to do. Press
yto stage,nto skip,sto split, or?for help. -
Commit the staged chunk:
Terminal window git commit -m "docs(orchestrator): document known routing limitations" -
Review your final three-commit history:
Terminal window git log --oneline
Part 6 — Push to GitHub
-
Push your commits to your fork:
Terminal window git push origin main -
Open your fork in the browser:
https://github.com/YOUR-USERNAME/git-github-security-learning -
Navigate to
starter-project/python/orchestrator/— yourREADME.mdrenders automatically below the file listing. -
Click the Commits link to see your history. Notice how descriptive commit messages make the history readable without opening any files.
Markdown Reference
Markdown is how GitHub renders README.md files and course content. Here are the elements used most often in this course:
# H1 — Page title (use once per document)## H2 — Major section### H3 — Subsection
Regular paragraph. **Bold**, *italic*, `inline code`.
> Blockquote — useful for callouts or documentation quotes
- Unordered item- Another item - Nested (two-space indent)
1. Ordered item2. Second item
| Column A | Column B ||----------|----------|| Cell | Cell |Inline code: `git status`
Fenced block with syntax highlighting:```bashgit add .git commit -m "feat: my change"git push origin main```[Link text](https://example.com)[Relative link](../other-file.md)

<!-- Shields.io badges -->[](LICENSE)Summary
In this module you:
- Learned the three areas of Git — working directory, staging area, and history — and why the staging area gives you control over what goes into each commit
- Used
git add,git commit,git status,git diff, andgit logto build and inspect the Orchestrator’s commit history - Wrote Conventional Commits messages including a multi-line message with an explanatory body
- Authored a README.md in Markdown that describes the full A2A system architecture
- Used
git add -pto stage individual chunks rather than entire files - Pushed commits to GitHub and inspected the rendered result
A clean, readable commit history is one of the most underrated skills in collaborative software development. Every commit you make from here on is a message to your future collaborators — and your future self.
What’s Next
Module 02 · Branching & Merging →
You’ll create a feature branch to add the Search Agent to the A2A system,
experience a real merge conflict, and learn why no one — not even maintainers —
should push directly to main.